CAC CareNet User Guide
User Guide
Introduction
Welcome to CAC CareNet (CACCN). We are thrilled that you chose us to help you in your case management and reporting needs. Our clients range from Child Advocacy Centers, Domestic Violence & Sexual Assault Service Providers, Advocacy Agencies, and Mental Health Providers, both government and non-government organizations. We strive to meet each agency's needs while maintaining the flexibility to meet everybody's needs.
This user guide is intended to be a reference for you whether it's your first time using CAC CareNet or your a seasoned pro and just need a quick refresher. Each section will contain links to step-by-step tutorials that will walk you through the various functions of CAC CareNet.
Accessing CAC CareNet
To view the step-by-step tutorial on how to log in and out of CAC CareNet, click
HERE
. This will open in a new tab.
The first step to using CAC CareNet is logging in. When you established your account with us, you or your agency administrator, should have received an agency specific URL or website address that typically looks something like this - "
youragencyname
.caccarenet.com."
You should have also received your username and password. Once you have this information, follow the steps below:
 We recommend using Google Chrome, Mozilla Firefox, Safari, or Microsoft Edge. We do not support Internet Explorer and cannot guarantee all features will work correctly if you are using Internet Explorer.
Open a browser – we support Google Chrome, Mozilla FireFox, Safari and Microsoft Edge. We no longer support Internet Explorer.
Type in your agency’s CACCN URL or web address.
Press “Enter” on your keyboard.
Secure Connection - If your connection is secure, you will be asked to enter your username and password.
Unsecure Connection – If your connection is not secure, you will go to a page that asks you to click a link (HERE) to be redirected to a secure connection where you will enter your username and password.
Establishing a secure connection means anything you are entering is encrypted and the information you are entering is protected.
Once you are logged in, you will automatically be directed to the Dashboard.
Dashboard
The Dashboard has two columns; Recent Clients and My Clients
Recent clients provides a list of the last 10 client YOU have accessed in the system. This is user specific and means that you will not see the same clients under recent clients as a coworker unless you accessed the EXACT same clients in the EXACT same order.
My clients show the clients that have been assigned to you under the Case Tab. If you do not have any clients assigned to you, you will not see any clients in this column.
Admin Workflow: Setting up CAC CareNet and Left Menu Features
Now that you have successfully logged in, let's talk a little about setting up CAC CareNet as a new user. We call this the admin workflow as it outlines a step-by-step process for you as an agency to customize the system to your agency. Taking the time to add personnel, manage permissions, add agencies, modify lists, manage document folders and set your agency's preferences will pay off down the road when it comes time to run reports. It also streamlines information for your employees as you provide options in the editable drop down menus that are relevant to YOUR agency.
This flow chart gives you a general overview of the admin workflow process, what sections of the left menu you'll use to get started, and what to do when you get there.
While the chart above gives you an overview, to get the most out of CAC CareNet, you'll want to have a solid understanding of what functions exist in the left menu. Here they are, in order:
Search
At the top of the left menu, you'll see a search box. Here you can type in a client or contact name to search the system.
Dashboard
Clicking on "Dashboard" from anywhere in the program will allow return you to the dashboard.
Clients
Search: This function allows you to search by first name, last name, date of birth, gender, active status (active, include inactive, and inactive only), agency case #, and CACCN Case #.
Extended Search:
This function allows you all of the same search options as search, but adds the ability to search by relationship and perpetrator status (yes/no).
Advanced Search:
Under both “Search” and “Extended Search” you’ll see a dropdown option titled “Advanced Search.” This allows you to search by the following options:
- CPS Case#
- LE Case#
- Prosecution Case#
- Referring Agency
- Screened (In or Out)
- Funding Source
- Last Modified (Date)
- Alias
- Service Start Date
- Service End Date
Add New:
Add New is how you will enter new clients into the system. We will go in to more detail on this later when we get to the client workflow portion of the user guide.
Client Referrals:
This is where you will manage the referrals that have been submitted by referral users for Law Enforcement and DHS. We will cover how to set up a referral user under the admin workflow portion of the user guide below.
Attendance Records:
Not all agencies use this section, but if you have a program that requires you to check off attendance or sign clients in or out, this may be of interest to you. You can scroll through the list to find the client you wish to check in or use the filter text box to type the name of the client you are checking in. You can use the “Active Status” drop down to designate who you see in the list, similar to the search function where you can limit by “active only, include inactive, or inactive only.” Once you click “Check In” it will automatically enter the current time for “Time In” and “Time Out.” You can then save or delete the entry for each client. You should know that at this time, there is no way to report on this function.
Personnel
To view the step-by-step tutorial on how to add system, non-system and referral users, click
HERE
. This will open in a new tab.
Personnel Dashboard:
The personnel dashboard opens to the Personnel Management screen. You’ll see three options; Search Personnel, Add a New Person, and Add a New Person Type.
Search Personnel: Once you have clicked on “Search Personnel” you will be taken to the Personnel Search window. Here you can search by personnel’s first name, last name, date of birth, person type or role, gender, and active status (active only, include inactive, or inactive only). You can also restrict your search by “User Only” by checking the box just above the blue search box. This means you will only see those personnel that are designated system users for CACCN.
On the right side of the screen you will see “Results” which is where your search results will appear.
To access the users profile you searched for, simply click on the “Profile” button in the column furthest to the right titled “View”
Add a New Person: By clicking add new person from the personnel dashboard, you will enter the “Add New Person” window that allows you to enter all of that individual’s information. All fields in red are required. Here you will select the role they hold (this is set up through “Add Person Type” which we will cover in a moment”
You will also have the option of designating this person as a system user which will reveal fields for username and password as well as the option of referral user.
Add a New Person Type: This section will allow you to add user types that you can later assign to personnel you are adding to the system. There is a quite a library of existing user types, so be sure to scan the list before adding a duplicate. It may just be a matter of making an existing role visible. This is easy to do, simply click “Edit Visibility” find the role you wish to make visible, check the box in the right column, then click on “Save”
All three of these options can also be accessed individually under the Personnel section of the left menu.
1.
Add Person
2.
Search
3.
Add Person Type
Security
To view the step-by-step tutorial on how to set up security groups, permissions and assign users to groups, click
HERE
. This will open in a new tab.
Users & Groups:
This section allows you to assign users to a permissions profile that is established under “Permissions” the second item under “Security”
Permissions:
Permissions is where you create and edit permission profiles for system users.
Security Groups Manager:
The security groups manager section of the program allows you to determine which profiles show up in the “Users & Groups” and “Permissions” list(s). Consider how your agency is structured and how you would like to designate permissions for your agency. For example, many times you have an executive director that has ALL permissions. Then you maybe have one or two staff that you want to have everything, except the ability to delete a client. From there, you may designate line staff, advocates, forensic interviewers, medical staff, therapists, etc. Volunteers may have access, but if you want it to be very limited, this is where you set those restrictions.
You'll actually want to work this section in reverse order if you are just starting out.
Schedule
This feature allows you to set up and assign appointments to personnel. You can search for existing appointments by personnel and/or clients, and change the calendar view to day, week and/or month. To create an appointment, you can navigate to the day and time you wish to create an appointment for then double click to create an appointment. You an also just double click anywhere on the calendar and change the date and/or time at the bottom of the appointment window.
Reporting
Site Reports
This section includes pre-built reports that require only a date range to run. Your agency may have had specific site reports built for them, but most agencies will see the following reports listed:
Cases by User
Client Services
DCFS Report
Missing Active
Missing Information
NCA Report
New Client Details
New Client
Open Cases
VOCA Report
Custom Reports
This section allows you to run reports by:
Gender
Race
Ethnicity
Age
Home Phone
Mobile Phone
DOB
You can also filter by person, start date, end date and clients or users only.
Report Builder
Report Builder allows users to create custom reports with multiple variables. We’ll get into this a bit later as it is its own training, but imagine if you wanted to run a report on all minors from a specific county that presented with an allegation of sexual exploitation from January 1, 2018 to present day. You could do that here.
Report Library
When you build a report in report builder and you want to save it for future use, you can! These reports are stored in your report library. Users can make reports visible or remove visibility for reports in the report builder library as long as they have permissions to do so.
Report Settings
Report settings allows users to specify which reports history will save and identify statistical favorites.
Report History
Report history provides a log of all reports ran. You can search for a specific report by date using the filter at the top. You can also use the search function to search by using the filter at the top. You can also use the search function to search by
Admin
Site Options
Site Options allows you to establish the following settings:
Agency: this is where you identify your agency
Timezone: what is the default timezone for your agency?
Primary Contact
Referral Manager
Days Until Password Needs to Be Changed: If you wish to require your employees to change their password at a certain interval, this is where you would designate that.
Client Name Composition: You can choose options like Last, First, Middle, First Last only, Last First only, etc.
Notification: Client Inactivity Days - You can set the number of days before the system alerts you (through notifications) that a client has been inactive
Agency Case# Pattern: Here you can customize your agency case # format should you elect to use your own by checking the “Use Agency Case Number” checkbox.
Application Timeout (Minutes): You can set the number of minutes allowed to lapse before your session ends and you are logged out of CAC CareNet.
Use Agency Case Number Checkbox: This is where you designate whether you wish to use your agency’s case number
Multi-Agency Site Checkbox: Contact CAC CareNet support before checking this option as it may result in additional fees.
Show Townships Checkbox
Form Dashboard
Your form dashboard holds all available forms for your agency that were built using form builder. Here you can add a new form or edit an existing one.
Modify Lists
This is an important section to become familiar with in CACCN. Each agency will want to make sure the options available in CACCN in the dropdowns are specific to their agency. This includes things like living situation or schools on the client’s profile, or abuse types and dispositions when entering allegations. You can also edit information related to encounters here.
Caution: Before modifying the encounter services list, be sure to have a conversation with a CACCN support person to ensure you do not do anything to change your service mapping. Service mapping is how we designate what service ties to what report. This is very important when it comes to site reports like VOCA and/or NCA.
Agency Manager
To view the step-by-step tutorial on how to use add agencies, click
HERE
. This will open in a new tab.
Agency manager is how you add or edit agencies for personnel in CAC CareNet. For example, if you went to add a personnel that you wanted to assign as an investigator for a law enforcement agency on the case tab when entering an allegation, and realized they did not exist in the system, nor did their agency, you would start here before adding the individual. This allows you to assign the person you are adding to this agency when you are entering their information.
To edit an agency, click the blue square with the white pencil icon in the “actions” column on the left next to the agency you wish to edit. Their information will appear at the bottom of the page where you can make necessary changes. Be sure to click “Save” before moving on!
To add an agency, simply click “+Add Agency” and enter the agency information in the fields that appear at the bottom of the page. Again, be sure to click “Save” when done.
Document Manager
To view the step-by-step tutorial on how to use document manager, click
HERE
. This will open in a new tab.
You may remember from the demo (if you had one) the documents tab in a client’s case file. On this tab, there are folders where you can upload documents. You can customize what folders appear here AND who can see them. This is all done right here under Document Manager.
When you click on Document Manager you will see a list of existing folders. Clicking the blue square with the white pencil under “Actions” will allow you to edit the folder, lock the folder and assign it to specific individuals.
If you see a file in the table that you would like to have appear, that is not currently visible, you will want to click “Edit Table.” This will allow you to check the visible box next to the folder you want to appear in the document section of your clients’ cases. This will appear for ALL clients. There is no way to individualize this.
If you have information you want to restrict access to (i.e., police reports, medical exams, therapy notes, etc.) you can lock the folder and restrict it to just those individuals that should have access. Either click to edit the profile – click the checkbox for “Locked” then type in the person(s) name in the box to the right titled “Accessible By.” You can add as many individuals as needed here.
To add a folder that does not exist in the table, click “+Add Document.” You will be asked to enter a folder title, choose whether it should be locked and if so, who it should be accessible by. Once you have done this, click “Save” and you will see this item appear in the table above. It should have a check in the column for “Visible” and “Locked” if you chose this option when you added it.
MDT Manager
One of the newer features of the program allows you to add a client to an MDT Roster directly from their profile. MDT Manager is where this information goes and where you as a system user would manage it.
From MDT Manager, you can create a meeting, edit a meeting, view previous meeting details, and/or edit a meeting.
Help & Support
To view the step-by-step tutorial on how to use the help desk and knowledge base, click
HERE
. This will open in a new tab.
In the bottom left corner of CAC CareNet, you'll see a blue circle with a white question mark.
By clicking on this icon, you will be able to view the knowledge base which contains step-by-step tutorials to help you use CAC CareNet, submit a support ticket, and see announcements from your support team.
Admin Workflow: Things to Consider
Whew! We have made it through the left menu, now let's talk a little more about admin workflow.
We talked about it at the beginning of this section,but just to recap...when you are setting up CAC CareNet for your agency, there are a few things you will want to get setup BEFORE you start entering clients so that you don't have to keep going back and forth between the clients and left menu options to get everything the way you want it. That brings up a little tip that you might find useful as you are using the software...
There are also a few questions you’ll want to work through as an agency to establish your own workflow. Creating policies and procedures that outline what does and does not get entered into CAC CareNet is not a bad idea. Making sure staff understand how information is entered and how it affects reporting can help to ensure better reports down the road.
Consider the following:
Data in is Data out – Always think of how you will want to report this information when editing lists, services, etc.
Establish internal policies
Who gets added to the system? How do you define clients and who do you have to report on? If you are an agency that provides services to both children and adults, to include parents of victims you may want to enter both as clients in this system so you can track services provided to both. There are ways to differentiate why they presented to the CAC through abuse type and the type of service you select under encounters. Being intentional now in how you set this up will save you time later.
How do you use the Date Referred to CAC? Is this the same as AFR for you?
Forensic Interviews report directly from the FI tab. If you do not enter them here, they pull to the site reports.
What service(s) will you use for your encounters and when? Think about what services you might need to report on down the road.
How will you track therapy? Do you do in-house therapy or will this be tracked in encounter services?
Medical does not report so you will want to train staff to use encounter services to track this.
How and when will you deactivate clients?
What list options do you want to make available? Remember, the fewer the better in terms of consistency. Redundancy is not your friend.
Client/Data Entry Workflow: Adding Client Information
Now that you know what functions exist on the left menu, it's time to start adding client's to CAC CareNet. We will go over each step to creating a client's profile and entering necessary information. There's a method to the madness, so we've created a chart to provide a visual of the client/data entry workflow process.
Adding a Client to CAC CareNet
A few things to know about adding clients to CAC CareNet:
To prevent duplicate entries in the system, you will have to search the database for the client you wish to add BEFORE the "Add New Client" button will become active.
Only the fields in RED are required, but think ahead in terms of reporting. What information is your agency required to report on for grant funding? Most reports require at minimum age, gender, race and ethnicity. The more information you can add here the better. We've found it's better to enter all the information up front as we all get busy and sometimes may not get back to adding the information down the road.
Since this is a User's Guide, let's go through each of the fields, in order on the "Edit Client" screen:
2.
Military Family:
Checking this box will allow you to report this feature.
3.
Registered Date:
This is the date first came to your agency.
4.
Living Arrangement:
Enter client's current living arrangement here. This is a field that you can customize in modify lists.
5.
In CPS Custody:
You can track which clients are currently in CPS custody with this field. Simply choose Yes or No from the dropdown. This is a reportable feature.
6.
Title:
If the client has a preferred title, enter that here.
7.
First Name:
This will automatically populate if you typed the first name into the first name search field when searching to make sure this client did not already exist.
8.
Last Name:
This will automatically populate if you typed the last name into the last name search field when searching to make sure the client did not already exist.
9.
Suffix:
If applicable, enter it here.
10.
Alias:
You can enter known monikers or nicknames for the client here. This is a searchable feature.
11.
Middle Name
12.
DOB:
This is not a required field, but it is an essential one. This is how age is calculated in your reports.
13.
Gender:
A required field, you cannot save unless you have selected an option for gender here. Your options include Male, Female, Nonbinary and Unknown.
14.
SSN:
If your agency collects social security numbers, you can enter that here.
15.
Address Line 1:
Enter the client's address here.
16.
Address Line 2:
You can add details such as apartment or suite # here.
17.
Zip Code:
THIS IS IMPORTANT! Enter the client's zip code then use the TAB key on your keyboard to move to the City field. You'll see if you do it this way that the City, State AND County auto-populate for you. This will reduce the likelihood that someone misspells the county or enters it in a different format. This can cause issues down the road in reporting.
18.
City
19.
State
20.
County
21.
Email Address
22.
Race:
Commonly reported field.
23.
Ethnicity:
Commonly reported field.
24.
Tribal Affiliation:
Commonly reported field.
25.
Primary Language:
Commonly reported field.
26.
Secondary Language:
Commonly reported field.
27.
Employer:
If applicable
28.
School:
This is a field that you can customize in modify lists to reflect your geographical region.
29.
Special VOCA Classification(s):
This is a reportable field. All of the options included by default are required VOCA classifications. This is a field that you can customize in modify lists.
30.
Special Needs:
You can add notes that provide information on client's special needs in this narrative box. This is NOT a reportable field.
31.
Comments:
You can add notes that provide general information for this client in this narrative box. This is NOT a reportable field.
32:
Phone Numbers:
You can add multiple phone numbers AND mark whether the number added is safe to text and/or leave a voicemail.
33.
Link Person:
If you scroll down to the next section titled "Linking Persons to a Client's Account in CAC CareNet," you will find more information, but this is the button that starts the process! Once you've entered the client's information, you can link persons without leaving this screen.
34.
Save: After adding all of your client's information AND linking any persons to this client, you'll want to make sure you hit "SAVE"
35.
Delete Client Account:
This option is only available to users that have been assigned to a specific security group.

PRO TIP! Using your tab keys will allow you to move from left to right between fields, in order. By doing this, you'll take advantage of a key feature. Once you enter a zip code for a client, simply use the tab key to move to the next field. City, State AND County will automatically populate for you! This prevents issues with typos, or inconsistent information being entered that could affect reporting down the road.
Linking Persons to a Client's Account
View the step-by-step tutorial on how to link persons to a client's account
HERE
. This will open in a separate window.
 Note: This tutorial shows you how to link persons to an existing profile. If you have just added the client and are still in the profile, you can link persons to the client's account without having to leave the client's profile. Simply enter all of your client's information, then click on the "Link Person" button towards the bottom left of the screen. You can link as many persons as needed. Once you're done, simply click "Save"
You can actually create a client profile from a linked person. Scroll down to the contacts tab to see how!
Profile Tab
By clicking on the profile tab, it will return you to the profile view of the client's case. Here you can view basic information such as the client's birthday, age, case #, race, ethnicity, linked accounts, and insurance information.
Activate for Reporting (AFR)
Immediately after you enter a client in to CAC CareNet and save their profile, you will notice that the tab on the far right, titled "AFR" is blinking in RED. Get in the habit of heading directly to the AFR tab to set the "Date Activated for Reporting" immediately after creating the client's profile so that the AFR date auto-populates for you going forward. It will just save you some time and having to go back and forth. You'll understand when you get to the Case Tab!
The activate for reporting tab has a few different features, but it's primary functions let you control which clients show up in your reporting through the active for and end of reporting dates, and determine who shows up in your search results through the inactive function. It also lets you track why a person became inactive which can be handy information for reporting.
We will go through each field on this tab individually below.
1.
Date Activated for Reporting (AFR):
This lets you choose the date this client should be activated for reporting aka included in your agencies reporting. This is typically the date that the client enters your agency, on paper or in person. You can enter the date in manually, or click on the calendar icon to find the date.
2.
Activate:
After entering the AFR date, you'll need to click this button first, THEN click on "Save"
3.
Save:
After clicking "Activate" click "Save" to record your changes.
4.
End of Reporting:
To end a client's reporting participation, you'll want to enter an End of Reporting date. Client's will still show up in reports for the time period they were active for reporting by setting an end of report date, they just will not continue to show up when you are searching for active clients in report builder if there is an end of reporting date entered. This is different than "Exclude for Reporting" the red button or # 7 in the above screenshot.
5.
End Reporting:
After entering the end of reporting date, you'll need to click this button first, THEN click on "Save"
6.
Save:
After clicking "End Reporting" click "Save" to record your changes.
7.
Exclude from Reporting:
If Exclude from Reporting has been selected, this client will not show up in reports AT ALL. Not even for the period they were active.
8.
Inactive:
Making a client inactive means that they will no longer appear in your search results (so long as you are searching for active clients only). This just reduces the number of clients the system has to search through to find the result you are looking for. You would still need to enter an end of reporting date if this client is no longer engaging in services.
9.
Inactive Date:
Enter the date you wish to make this client inactive here.
10.
Inactive Reason:
You can select why this client was marked inactive. This is something some agencies find useful for reporting.
11.
Inactive Notes:
This allows you to capture notes pertaining to why a client was made inactive.
12.
Save:
Once you have entered an inactive date, reason and notes, be sure to click "Save" to record your changes.
Contacts Tab
The Contacts tab will allow you to view all persons linked to a case. This could be parents or guardians, relatives, co-victims, professional contacts, and/or perpetrators.
Contacts are always color coded. Clients will be
GREEN
and perpetrators in
RED
. All other linked persons will be in
BLUE
.
If you have entered a co-victim who is also going to be a client, you can add them by simply clicking on "Create Profile" on the Contacts tab of the client you originally created. See the image above.
The client is Cindy Brady, but she has a co-victim,her brother Peter. Instead of going to clients on the left menu, clicking add person and searching for Peter, you can simply click "Create Profile" and enter the relationships to the linked persons listed. You'll then be taken to Peter's profile where you can edit or remove linked person information for his case.
Know that the linked persons will follow the profile, but their designation as perpetrator will not. You'll have to make sure you designate who the perpetrator is for each client as this is not always the same person.
Case Tab
This may well be one of the most important sections of the program and often the most overlooked. The Case Tab is where you can assign a primary staff, designate an MDT Coordinator, and assign staff as following a case. In addition, the Case Tab is where you enter allegations and include information from law enforcement, CPS, and prosecution.
If you have to report by abuse types, dispositions, referral source and/or incident county, the Case Tab is where it's at. Let's break it down...
1.
Agency Case Number:
This is your agency's case number. The format can be changed in your site options under "Admin" on the left menu.
2.
Primary Victim Advocate:
You can use this field as labeled, or you can designate it as primary staff for your agency. By assigning a person to this role, you make sure that they are updated with changes that occur to the case through the notifications in the upper right (the bell with the red numbers overlaid).
3.
MDT Coordinator:
If your agency works as part of an MDT, you can assign the coordinator here.
4.
Following Case
: You can choose multiple personnel from this list to keep them notified of updates or activity on the case. Notifications will appear in the upper right corner.
5.
Save:
After entering your information in fields 1-4, you will need to click "Save" before moving on to adding an allegation below. These are separate sections and saving in one will NOT save in the other.
6.
+ Add Allegation:
To add an allegation for a client, you'll start by clicking here.

Once you have entered multiple allegations for a client, you will notice that a field titled "Primary Allegation" appears here. This allows you to select from a drop down list which allegation is considered primary for this case.
Adding Allegations
The allegations section of the Case Tab holds many fields that are reported on by agencies. It also has a number of fields that can be customized for your agency. Let's take a look:
1.
Copy Primary Information:
The copy allegation button will make more sense when you have more than one allegation entered for a client. This is intended to save you time when having to enter multiple allegations for a client. Once you have created a primary allegation (aka the first allegation), when you add a second allegation and click "Copy Primary Information" then all of the the information from the primary allegation will be copied to your new allegation with the exception of abuse type, disposition and perpetrator as these should be assigned for each allegation.
2.
Abuse:
This is where you enter the type of abuse client is presenting to your agency with. This options in this list can be customized in Modify Lists under Admin on the left menu.
3.
Agency Disposition:
Select the disposition of the abuse entered here. This list is also customizable through Modify Lists under Admin.
4.
Funding Source:
You can assign a funding source here if this makes sense for your agency.
5.
Perpetrator:
You will find this list is populated with the persons you have linked to the client's account. If you have not linked anybody, this list will be empty.
6.
Screened By:
This allows you to specify who in your agency completed the screening. This list is populated through individuals entered in personnel.
7.
Screened In & Screened Out:
This is where you can indicate whether the client meets criteria for services with your agency. If all client's being entered in the system are by default "screened in" you can choose to leave these fields unchecked.
8.
Referral Source:
You can specify who referred this case to your agency. This is a list that is customizable by adding non-system users to the system through Personnel. Remember, if their agency hasn't be created in Agency Manager under Admin, you'll want to do that before adding that agency's personnel.
9.
Jurisdiction:
You can choose which jurisdiction is responsible or is lead on a case here. This is customizable through Modify Lists under Admin.
10.
Date Presented to CAC:
This date is one that is commonly used in reporting. If you are not a CAC, think of this as "Date Presented to Agency." This will auto-populate with the Activate for Reporting Date or AFR. This is why we have you set your AFR after you create the client profile and BEFORE you move on to the Case Tab.
11. Date Incident First Reported: This will auto-populate with the AFR date, but can be changed if you have a case where they are not the same date.
12. Incident State: This field allows you to capture the state where the abuse occurred. This may be different than the client's residence and is a field some agencies report on.
13. Incident County: Different than the client's county of residence, this is also a reportable field.
14. Incident Location Type: This is a list that you can customize the available options for through Admin - Modify Lists. For cases involving trafficking, we've seen agencies include websites and/or specific hotels to be able to identify patterns or provide information to their local task forces.
15. Incident Location Description: This is not a reportable field, but it allows you to provide more detail, if needed on the incident location's description.
16. Reason for Referral: This is not a reportable field, but it allows you to document the reason why your agency is receiving this referral.
17. Co-Victims: If you have linked person to the client's account and designated them as co-victims, they will appear in the drop down and you can link them to the allegation here.
18. Narrative: This field is intended for to you make detailed notes on the allegation at hand. This field is not reportable. It will provide you a character limit warning in the bottom left corner.
19. Save: Once you have entered all of the information outlined above, click "Save" to record the allegation.
20. Cancel: This will allow you to cancel the allegation or changes to an existing allegation.
21. +Add Allegation: This will allow you to continue adding allegations to a case. Remember, save yourself some time and use the "Copy Primary Information" button for subsequent allegations.
Once you save your allegation, you'll notice three additional fields appear on the Case Tab: Law Enforcement, Client CPS, and Prosecution.
Law Enforcement
The law enforcement section of the Case Tab allows you to store law enforcement specific information related to the above allegation. Each time you create a new allegation, a new law enforcement section will be available. Let's take a look at the fields and what they are for:
1.
Case Number:
This is the law enforcement case number. You will be able to search by this using the advanced search function of either the basic or extended search under "Clients" on the left menu.
2.
Referral Date:
This could be used multiple ways and will depend on your agency, your workflow, and how you interact with law enforcement. This could be the date LE received the report, or the date they made the referral to your agency.
3.
Referring Person:
Similar to the referral date, this is going to be defined by you and your agency. Is it the person that LE received the initial referral from or the person from LE that made the referral to the CAC or your agency?
4.
Investigation Open Date:
Date when law enforcement opened the investigation.
5.
Investigation Close Date:
Date when law enforcement closed the investigation.
6.
Investigating Person:
Law enforcement person assigned to the case.
7.
Was Arrested:
Document whether an arrest was made on the associated allegation.
8.
Date Arrested:
If arrest was made, date of arrest.
9.
Charges Filed:
Indicate the status of charges in the case. Options can be customized in Modify Lists.
10.
Date Charges Filed:
If charges were filed, enter the date they were filed here.
11.
Charge:
Specify what charge(s) were filed here.
12.
Disposition:
Provide LE's disposition on the case here. This list can be customized through Modify Lists.
13.
Narrative:
This field allows you to enter details in narrative form. Remember, this field will not report.
14:
Save:
Be sure to click on Save before moving on to the next section to record your changes!
15.
Cancel:
If you clicked on + Add LE on accident or do not wish to save your changes to the LE section, click Cancel.
Client CPS
1.
CPS Case Number:
This is the CPS or DHS case number.
2.
Abuse Type:
Enter abuse type being investigated by CPS/DHS.
3.
Alleged Perpetrator:
Connect alleged perpetrator to the allegation being investigated by CPS/DHS here.
4.
Abuse Disposition:
This refers to the findings of CPS/DHS for the allegation being investigated. This list can be customized through Modify Lists.
5.
Date Referred to CPS:
Enter the date that CPS/DHS received the referral for the case.
6.
DHS Case Manager:
Identify the assigned case manager here.
7.
Investigation Open Date:
Enter when the CPS/DHS investigation began.
8.
Investigation Close Date:
Enter when the CPS/DHS investigation closed.
9.
Investigator:
Who was the assigned CPS/DHS investigator on the case?
10.
Referral Source:
Who referred the case to CPS/DHS?
11.
Referred for Other DHS Services:
Was client referred for other CPS/DHS services? This list can be customized through Modify Lists.
12.
Save:
Be sure to click on Save before moving on to the next section to record your changes!
13.
Cancel:
If you clicked on the Client CPS on accident or do not wish to save your changes to the Client CPS section, click Cancel.
Client Prosecution
1.
Prosecution Case Number:
Enter the prosecution case number here.
2.
Case Reviewed By:
Name of individual reviewing case for prosecution.
3.
Completed Date:
Enter the date case was reviewed.
4.
Date Referred to Prosecution:
Enter the date case was referred to prosecution.
5.
Decision to Prosecute:
Enter what the decision to prosecute was here.
6.
Leading Prosecutor:
Who is assigned as lead prosecutor on this case?
7.
Outcome Date:
If an outcome has been reached, enter the date of outcome.
8.
Referral Source:
Where did referral to prosecution come from.
9.
Narrative:
Enter any details associated with the case specific to prosecution here. This is not a reportable field.
10.
Add Charges:
To add charges filed by prosecutors, click the +Add Charges button. See detailed information below.
11.
Save:
Be sure to click on Save before moving on to the next section to record your changes!
12.
Cancel:
If you clicked on + Add Prosecution on accident or do not wish to save your changes to the Client Prosecution section, click Cancel.
Prosecution - Add Charges
1. Charge: Choose what charge was filed by prosecution here.
2. Disposition: Enter the disposition, if known, for this charge here.
3. Outcome Date: Date outcome was determined for this charge.
4. Delete: If you need to remove this charge, click the delete button.
5. Add Charges: If you need to add additional charges, click "Add Charges"
6.
Save:
Be sure to click on Save before moving on to the next section to record your changes!
7.
Cancel:
If you clicked on + Add Charges on accident or do not wish to save your changes to the Add Charges section, click Cancel.
Forensic Interview (FI) Tab
The forensic interview tab in CAC CareNet is where your agency will track all forensic interviews completed in CAC CareNet. Take a look at each field below to understand how information is recorded, and reported from this tab:
1.
Session Type:
Record the type of forensic interview here. The options in this list can be modified through Admin - Modify Lists.
NOTE: At this time, session status does not report. As a result, agencies are creating options such as "Initial Interview - Child Unable to be Interviewed" or "Initial Interview - Parent or Child Declined" in the "FI Session Type" which allows them to run reports showing how many FI's were not completed, and why.
2.
Associated Allegation:
This list is populated from allegations entered under the Case Tab.
3.
Session Status:
This allows you to designate the status of a forensic interview. As mentioned in the note above, this is not currently reportable. You can modify options available in this list through Admin - Modify Lists.
4.
Date All Activities Completed:
This is a date commonly used for major site reports such as NCA, as well as those you might build in Report Builder to see how many FI's were completed during a given time period. This is the system's confirmation that an interview occurred. It may not be a required field to save, but it is required for accurate reporting.
5.
Date Referred For Forensic Interview:
This refers to the date a referral was made for a forensic interview.
6.
Referral Source:
This allows you to track who made the referral for the forensic interview.
7.
Provider:
This allows you to select who performed the forensic interview.
8.
Did Child Disclose Abuse:
Pretty straight forward, but this gives you a place to record whether disclosure was made.
9.
Start Time:
This will allow you to capture the duration of the interview. It is essential that you enter both a start time AND an end time to prevent negative numbers from appearing in your reports if you choose to report on FI duration(s).
10.
End Time:
This will allow you to capture the duration of the interview. It is essential that you enter both a start time AND an end time to prevent negative numbers from appearing in your reports if you choose to report on FI duration(s).
11.
Did Someone Meet with the Family:
Record of whether someone was able to meet with the family or if they declined
12.
Location:
Record where the interview took place. This is reportable and the list can be modified through Admin - Modify Lists. Many agencies use this to designate whether the FI occured offsite, onsite, at a partner CAC, and/or in a mobile unit.
13.
Person that Met with the Family:
This allows you do specify who it was that met with the family.
14.
Observers of FI:
This allows you to record all individuals that were present and observed the FI. They must belong to an agency and have been added to the system (Personnel - Add Person) for them to appear in this list.
15.
Narrative:
Here you can record any information not captured above in note form. This is not reportable.
16.
Save:
Allows you to save all information entered in above fields
17.
Cancel:
Allows you to cancel the addition of an FI, or cancel changes you might be making to an existing FI.
18. +Add FI: This allows you to create records for forensic interviews.
Services Tab (The Tab Formerly Known as Advocacy)
The services tab is how you will track what services were provided for each client in CAC CareNet. This is important, not only for own internal reports, but for your larger reports like VOCA and NCA as they are mapped to the services section. Tracking medical exams, advocacy contacts, assistance with victim compensation, or even whether a client was referred for other services can be tracked here. You can even track the duration of the services you provide.
To view the step-by-step tutorial on Adding Encounters and Searching for Encounters in CAC CareNet, click
HERE
.
You should know that all text entered for an encounter becomes a "Keyword." This means that you can search for an encounter using any text you entered for the client. For example, if I knew that I met the client at Starbucks and recorded that in my narrative for my encounter service, I could click in the "Search" box in the above window and type "Starbucks" and it would return a list of all encounters that included that word. Pretty handy!
To add an encounter, start by clicking the "+Add Encounter" button above. You will then see the Encounter Information window below:
1.
Performed By:
Enter the name of the person that provided the service(s) selected below.
2.
Client Name:
The client name will populate automatically.
3.
Funding Source:
You can designate a funding source for an encounter service here
.
4.
Date Time:
Enter the date of the encounter here.
5.
Start Time:
Enter the start time of the encounter.
6.
End Time:
Enter the end time of the encounter.
Start time and end time will allow you to run reports on encounter duration, or how many minutes were spent providing which services for your agency. It is VERY important that IF you use the start and end time, that you enter both, not one or the other or leave them both blank. Also, be sure to verify AM and PM are correctly selected. Negative values will be created in your reports if the start and end times are not entered correctly.
7.
Contact Methods:
Select the method of contact for this encounter here. This list can be edited in Modify Lists.
8.
Victim Compensation: Choose either "Informed" or "Assisted" if victim compensation was part of your encounter service.
9.
People Involved:
This list automatically populates from the Contact Tab with any linked person(s) you have added. If applicable, choose the individual(s) present for this encounter.
10.
Encounter Notes:
This is where you can add your narrative, or detailed information on the encounter service. This is not a reportable field.
11.
Services Provided:
Choose all services performed in this specific encounter here by checking the box next to the provided service description.
12.
Save:
Click Save to record your changes/save this encounter.
13.
Cancel:
Click cancel to discard your changes/discard this encounter.
If you have questions about which services connect to which site report or need to remove services without affecting your existing reports, email
support@omstinc.com
for assistance.
Therapy Tab
The Therapy Tab in CAC CareNet has six tabs to track therapy related information: Referrals, Sessions & Progress Notes, Assessments, Tx Plans, Discharges, and Measures. Each tab and all fields related to each tab will be broken down below.
Therapy Referrals
To add a Therapy Referral, simply click on the "Referrals" tab under the "Therapy" tab, then click "+Add New Referral." You should now see the Therapy Referrals window. Let's take a look at each field and its function:
1. Referral Date: Enter date of therapy referral here. This field is reportable.
2. End of Therapy: Date therapy ended. This field is not reportable.
3. Referral Source: Who made the referral to therapy for this client? This list populates from Personnel. This field is reportable.
4. Provider: Select the name of the therapy provider. This list populates from Personnel. This field is reportable.
5. Therapy Accepted: What was the outcome of the therapy referral? Did client accept? Refuse? No Show? This field is not reportable.
6. Reason Not Referred: Why was a referral for therapy not made for this client, if required. If you do not require a therapy referral be made for your clients, you do not need to create a referral in the first place for clients that will not be referred. If you are an agency that requires it, this would be a valuable field to explain why a client wasn't referred. This list can be customized to your agency under "Modify Lists" - "Therapy - Reason Not Referred." This field is not reportable.
7. Referral Notes: This section allows you to provide detailed information related to this referral for therapy. This field will not report.
8. Signature: This box allows you to draw your signature using a stylus (depending on your computer), and/or your mouse. Simply place your cursor in the box, hold down the left mouse button, and drag to draw.
9. Printed Name: This is a required field. Enter your full name here.
10. Save: Click "Save" to record your changes and/or save the therapy referral.
11. Discard: Click "Cancel" to discard your changes and/or not save the therapy referral.
Sessions & Progress Notes
Therapy providers can record sessions and progress notes here. Once you have clicked on the Therapy Tab, you will see the window below.
1. +Add Session: Click this button to create a session/progress note.
2. Session Log: To print a session log for this client, click the "Session Log" button.
After clicking "+Add Session" the Therapy Session fields will display as seen below. While some of the fields here are pretty straight-forward, let's take a look at what you have available in this section:
1. Client Name: This will automatically populate with the client's name based on the profile you are in. To choose a different client, you will have to navigate to their profile.
2. Provider: Select the name of the therapy provider here. This list is populated from personnel. This is a reportable field.
3. Date Time: Enter the date of the session here. This is a reportable field.
4. Start Time: Enter the time the session started. Be sure to select AM or PM. This will report and is required if you want to report on session duration.
5. End Time: Enter the time the session ended. Be sure to select AM or PM. This will report and is required if you want to report on session duration.
Entering your start and end times incorrectly will result in issues with reporting duration of therapy sessions. For example, entering a start time and no end time or incorrectly entering an end time could result in negative values. If you do not want to use start time and end time, do not enter values for either field.
6. Funding Source: If you have a specific funding source tied to the therapy service you are providing, select it from the drop down list. This list can be customized in "Modify Lists" - "Funding Source." This is a reportable field.
7. Session Status: This field allows you to record whether the client accepted therapy, refused therapy, cancelled, or no-showed. You can customize which options appear here in "Modify Lists" - "Session Status." This is a reportable field.
8. Diagnosis: Select the diagnosis that applies to this session's focus. Most diagnoses include ICD-10 "F" Codes often used for billing as well as DSM coded diagnoses. This list can be customized in "Modify Lists" - "Therapy DX." This is not a reportable field.
9. Session Notes: Add any detail related to this session or progress note. This is not a reportable field.
10. Services Provided: Select the services provided in the session. Note that these are color coded with VOCA in Blue, NCA in Orange, NCA & VOCA in Green, and Agency Specific Services (neither VOCA or NCA) in Black.
Assessment
The assessment section of the Therapy Tab will allow you to create, sign, save, print, and/or record a client's mental health assessment within CAC CareNet. You will also be able to add an addendum to an existing assessment if changes are required to an assessment that has already been recorded. In addition, you can create multiple assessments for a single client here.
The Assessment is broken down into multiple sections: Client Information, History, Mental Health, Substance Use, and Clinical Summary. Enter all available information into the fields within each section. Once you are done,
draw your signature using a stylus or your finger for those of you with touchscreens, and/or your mouse. Simply place your cursor in the box, hold down the left mouse button, and drag to draw. You will also be required to type your full name in the box below the signature field before you can save.
Once you've entered the client's information into the assessment and signed it, you can hit "Save" "Record" or "Cancel." Record will lock the assessment and prevent you from being able to go back and make revisions. You will get a prompt warning you of this, requiring you to confirm that this is what you want to do.
You can print your assessment by clicking "Print" next to the "Cancel" button at the bottom of the page.
Tx Plans
Treatment Plans allows you to assign a clinician, set a plan date, and connect a diagnosis from an existing assessment. Once you have entered this information, you can save, record, add a goal, and/or print.
Click on "Add Goal" and you will see the following window. We'll break down all of the available fields in TX Plans and Add Goal below:
Treatment Plan
1. Clinician Person: Select the name of the clinician here. This list is populated through personnel.
2. Plan Date: Enter the date the Treatment Plan was created here.
3. Diagnoses: Select the diagnoses related to this treatment plan here. This will populate from client's assessments.
Goal
4. Delete: This button will allow you to delete a goal if you did not intend to create it or wish to get rid of it.
5. Start Date: Enter the date the goal will start being tracked here.
6. Completed Date: Enter the date the goals was completed here.
7. Diagnosis: Select the diagnosis this goal relates to here.
8. Modality: Click on the modality for this goal. This can be customized in "Modify Lists" - "Therapy - Intervention Modality."
9. Notes: Enter any details pertaining to this specific goal here.
10. Status: Select the status of the goal by clicking on the radio button to the left of the option you wish to select.
11. Save: Be sure to click "Save" after making changes to or creating a new goal. You will be able to edit the goal once saved.
12. Record: Record will lock this record. You will not be able to make changes to goals that have been recorded.
13. Add Goal: Additional goals can be added by clicking the "Add Goals" button.
14. Print: To print client's goals, click Print.
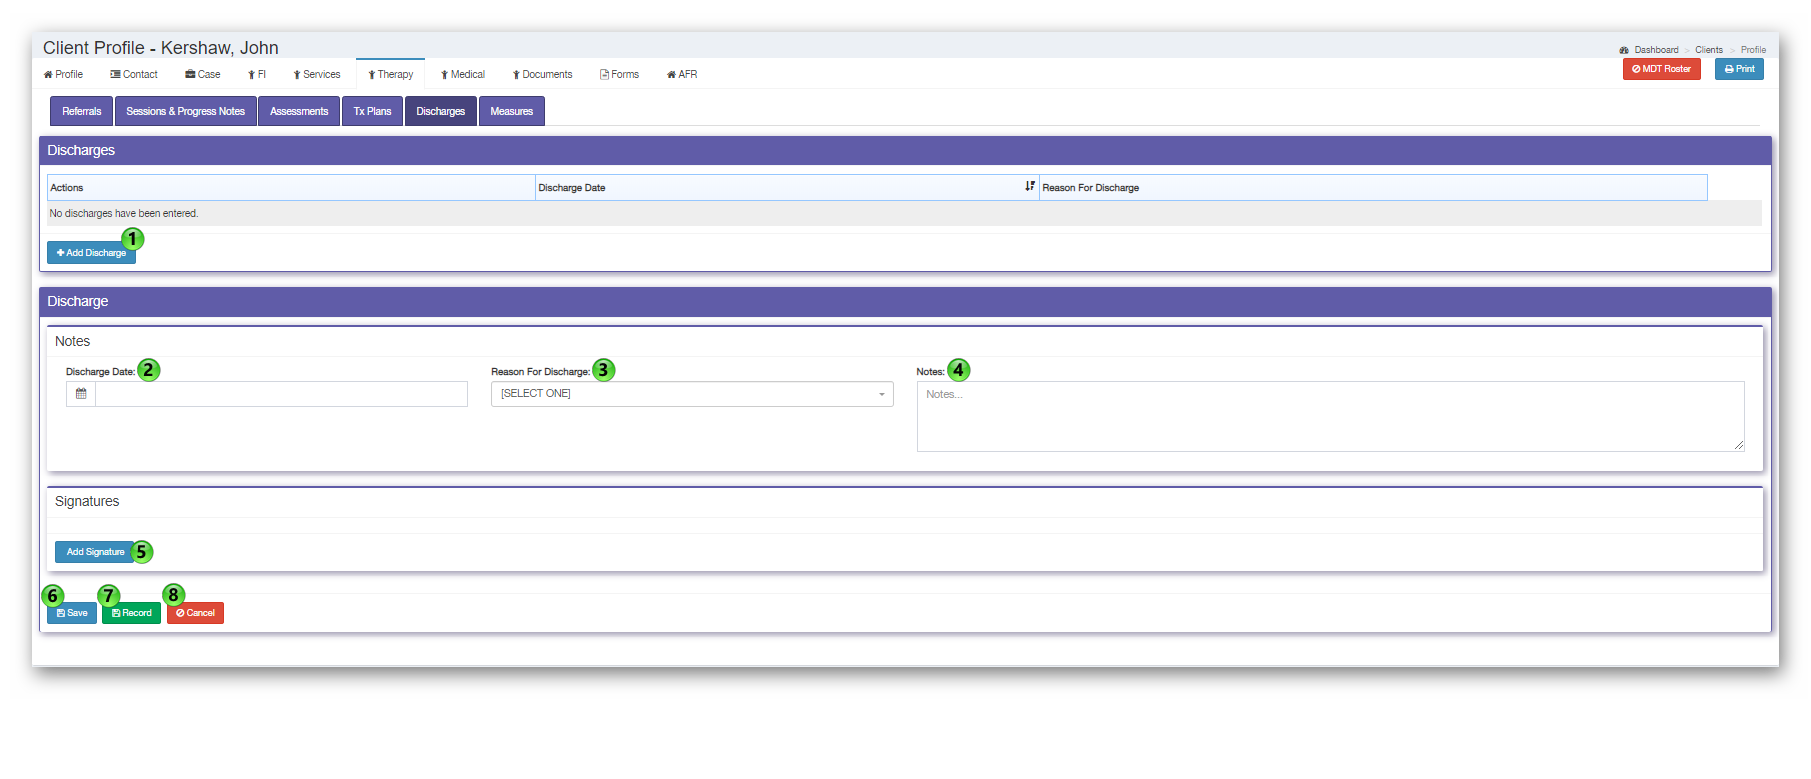
Discharges
 Measures
Medical Tab
The medical section of CAC CareNet contains the following tabs:
Vital Signs
Referral
General Hx
Developmental Hx
Psychology HX
Behavioral Hx
ROS
Interview
Physical Exam
Male/Female Exams
Lab Results
Impressions
Recommendations
There are updates coming to this section that will A) make it reportable, and B) combine the male exam and female exam into one tab, called genitourinary exam.
Until the update is released that will allow for reporting out of the medical sections, we recommend that you use encounter services to track medical exams completed by your agency and have us map those to the reports you need. Feel free to contact us at
support@omstinc.com with any questions.
Forms
Forms allows you to create digital, e-forms of your existing hard copy forms for your agency. When you signed on with CAC CareNet, you likely were told that a certain number of forms were included in your contract. This means that CAC CareNet will build these for you and they can be stored here. You can also build your own forms using form builder located under "Admin" on the left menu.
It is important to note that only certain information from the client's profile will autofill here and nothing you enter into the form will populate anywhere within CAC CareNet at this time. Stay tuned for future updates though as this is something we are working on!
Reporting
The reports section of CareNet provides multiple options for reporting your agency's information. Let's take a look at each section in detail:
1. Site Reports: These are pre-built reports that connect to different sections of CareNet. You simply select the report you wish to run, enter information in the fields under "Filter," Choose your output option (PDF or HTML) and click on "View" or "Download." This is where you can run both VOCA and NCA reports.
2. Custom Reports: Custom Reports allows you to run reports that include client information such as race, ethnicity, gender, age, phone number. Simply check the box next to the fields you would like displayed in the report, select a person if you wish to limit your search results to an individual, enter a start and end date, then decide if you want to view clients or users only. You can now either view or download your report. Hint: Choosing View Report will open it in a new browser tab.
3.
Report Builder:
Report Builder is a pretty sweet feature that allows agencies to build reports that work for them. While it can take a minute to get the hang of, we think it's worth the investment of time as it will save you so much more down the road. You can define what and who are included in your reports run informational or statistical reports for grant reporting. If you haven't seen it, schedule a training with one of our team members by emailing support@omstinc.com or view a view of our knowledge base articles: Report Builder Definitions & Filters or Missing Information Report Templates.
4. Report Library: You will find every report you have saved to your report library here. You can manage which saved reports are visible in report builder using the visible function in the right column. To make a report visible, or remove visibility, click "Edit List" and check or uncheck the box next to the report you wish to modify visibility for. A check means it will show up = visible, no check means it will not show up = not visible.
5. Report Settings:
6. Report History:
Helpful Information for CAC CareNet Users
We strive to provide you the best customer service possible. We know we will make mistakes, everybody does, but we are not above admitting them and will do everything we can to make them right. You'll get personalized attention from one of our team members when you have questions, need additional training, or need to report an issue with the software.
There are a few different ways you can contact us:
We recommend email as it will automatically generate a support ticket. We are notified in real time.
Terms & Definitions
Dashboard
The homescreen of CAC CareNet.
Admin
Located at the bottom left of the left menu, Admin holds many features your system administrators will use to set up and manage CAC CareNet.
Count
This is a term you'll hear a lot in Report Builder. Count will provide you a total of an item, for example forensic interviews or advocacy encounters. A count will include all events for a client during a specified reporting period.
Distinct Count
Also a Report Builder function, Distinct Count typically pertains to people, as in counting # of clients served in certain period, or demographics such as race, ethnicity, and gender. A trick to differentiating between "Count" and "Distinct Count" is remembering that distinct and unique are synonymous and people are unique. So, if I am counting people, I want to use a distinct count!
Account
An account is what is created when you add a client into CAC CareNet. To edit an account, click on "Edit Account" from the client's profile (Profile Tab). You can create multiple accounts for one client. Many agencies do this if there is a gap in services and a client returns on new allegations. To create a new account for a client, open the client's profile and from the Profile Tab, click "+New Account." Once a new account has been created, you will see a drop down under the client's name that lets you toggle between all available accounts for that client. You'll also notice you now have a clean slate in the Case Tab, FI's, Encounters (Advocate Tab), Therapy, and Medical. You will need to set an "Activate for Reporting" date for this new account on the AFR tab to include anything you enter here in reporting.
Linked Accounts
You'll see this on the client's profile page in the upper right corner. If you have connected accounts, as co-victims, they will show up here. Nothing in this section means that there are no accounts are linked to this client. If you need to link accounts, you can click "Edit Account" here on the profile screen, scroll to the bottom of the page, then click on “+Link Person.”
CareNet Administrator
Each agency that uses CAC CareNet typically has appointed somebody as their CAC CareNet administrator. This is the person that signed up for CAC CareNet and manages the security permissions, adds users, and manages system settings. This is also the person you'll want to go to if you forget your login information.
Related Articles
Creating a Referral User - Step by Step
Utilizing the referral system within CAC CareNet makes accepting referrals from outside partners (LE, CPS, etc.) an extremely easy process. A referral user will have a limited view of CareNet, meaning they will not be able to view client profiles, ...CAC CareNet Update 2.26.1
We have enhanced the following areas of CAC CareNet: NEW Tasks Create tasks or action items from the dashboard or client accounts Create task lists, reminders, set priority levels and progress, and discuss tasks with other personnel Create predefined ...Referral & Video User Setup (Portal) - Step by Step
The new portal option within CareNet allows you to have more customization over referral users, video referrals and dual access to CareNet. Specifically, when a portal user is setup you can: Designate a user as only referral Designate a user to only ...Checking a Personnel's User Group - Step by Step
Within CareNet it's knowing how to check someone's user group is an important task. As the user groups within CareNet directly interact with permissions. To learn how to easily find what user group a personnel is apart of, please follow along below: ...CAC CareNet Update 2.27.1
We will be enhancing the following areas of CAC CareNet: Client Search Manager Various styling and formatting updates Moved Active/Inactive selection field to the main search window Added the ability to turn the default personnel field off/on View ...
Announcements
Browser Compatibility (Support for IE 11 Discontinued)
CAC CareNet provides support for many of the latest browsers. We strongly recommend that agencies use one of the following: Google Chrome FireFox Safari Microsoft Edge Microsoft Chromium Edge *New Development and Support for Internet Explorer 11 has been discontinued. Please update to one of the for-mentioned browsers.